Freeswitch 安装指南
系统要求
- 操作系统:Ubuntu 22.04 LTS
- 服务器推荐配置:2核4G内存
第三方组件说明
以下说明仅供参考,具体配置和使用方法请参考 FreeSwitch 官方文档。
简介
FreeSwitch 是一个开源的通信软件平台,用于搭建微语呼叫中心模块,如果不需要呼叫中心,可不安装。本文档将指导您完成 FreeSwitch 1.10.12 版本的安装过程。
环境准备
- 本安装指南适用于 Linux 系统(如 Ubuntu/Debian)
- 所有命令均需在 root 用户权限下执行,无需每次添加 sudo
步骤一:安装必要的工具和依赖
# 安装所有必要的开发工具和依赖包
apt -y install unixodbc-dev mysql-connector-odbc git build-essential automake autoconf libtool libtool-bin python \
  zlib1g-dev libjpeg-dev libncurses5-dev libssl-dev libpcre3-dev libspeexdsp-dev \
  libspeex-dev libcurl4-openssl-dev libopus-dev libsqlite3-dev libldns-dev libedit-dev \
  pkg-config uuid-dev* yasm libks* cmake libtiff* libpq-dev
步骤二:编译安装依赖库
以下几个组件需要从源码构建。如果 git clone 下载困难,可以从对应 GitHub 页面下载 zip 包后解压使用。
1. 安装 libks
git clone https://github.com/signalwire/libks.git
cd libks
cmake .
make && make install
cd ..
2. 安装 signalwire-c
git clone https://github.com/signalwire/signalwire-c
cd signalwire-c
cmake .
make && make install
cd ..
3. 安装 sofia-sip
git clone https://github.com/freeswitch/sofia-sip.git
cd sofia-sip
./bootstrap.sh
./configure
make && make install
ldconfig
cd ..
4. 安装 spandsp
注意:必须使用特定版本,最新主分支代码可能导致问题
git clone https://github.com/freeswitch/spandsp
cd spandsp
git checkout -b finecode20230705 0d2e6ac65e0e8f53d652665a743015a88bf048d4
./bootstrap.sh
./configure
make && make install
cd ..
5. 安装 Lua 5.3.0
curl -R -O http://www.lua.org/ftp/lua-5.3.0.tar.gz
tar xf lua-5.3.0.tar.gz
cd lua-5.3.0
make MYCFLAGS="-fPIC" linux
make install
cd ..
6. 安装 libav
git clone -b release/12 https://github.com/libav/libav.git
cd libav
# 必须编译成共享库
CFLAGS=-fPIC ./configure --enable-pic --enable-shared
make && make install
cd ..
7. 安装 libuuid
wget https://jaist.dl.sourceforge.net/project/libuuid/libuuid-1.0.3.tar.gz
tar -zxvf libuuid-1.0.3.tar.gz
cd libuuid-1.0.3
./configure
make && make install
cd ..
步骤三:安装 FreeSwitch
重要提示:请勿在
/usr/local目录下编译 FreeSwitch 源码,建议选择其他目录进行编译构建,否则安装阶段可能会遇到问题。
git clone -b v1.10.12 https://github.com/signalwire/freeswitch.git
cd freeswitch
./bootstrap.sh
# ./configure
./configure --enable-core-odbc-support --enable-core-pgsql-support

# 修改 Makefile 禁用编译警告
# 编辑文件 src/mod/applications/mod_av/Makefile,找到并删除所有的 -Werror 参数
SWITCH_AM_CFLAGS = -I/usr/local/include/uuid -I/usr/local/include/uuid  -I/root/freeswitch/src/include -I/root/freeswitch/src/include -I/root/freeswitch/libs/libteletone/src -fPIC -ffast-math -Werror -Wno-unused-result -Wno-misleading-indentation -fvisibility=hidden -DSWITCH_API_VISIBILITY=1 -DCJSON_API_VISIBILITY=1 -DHAVE_VISIBILITY=1 -g -ggdb -DHAVE_OPENSSL

# 去掉 -Werror 参数之后为:
SWITCH_AM_CFLAGS = -I/usr/local/include/uuid -I/usr/local/include/uuid  -I/root/freeswitch/src/include -I/root/freeswitch/src/include -I/root/freeswitch/libs/libteletone/src -fPIC -ffast-math -Wno-unused-result -Wno-misleading-indentation -fvisibility=hidden -DSWITCH_API_VISIBILITY=1 -DCJSON_API_VISIBILITY=1 -DHAVE_VISIBILITY=1 -g -ggdb -DHAVE_OPENSSL

# 开始安装
make && make install

make mod_mariadb

# 安装完成,安装目录为 /usr/local/freeswitch

+---------- FreeSWITCH install Complete ----------+
 + FreeSWITCH has been successfully installed.     +
 +                                                 +
 +       Install sounds:                           +
 +       (uhd-sounds includes hd-sounds, sounds)   +
 +       (hd-sounds includes sounds)               +
 +       ------------------------------------      +
 +                make cd-sounds-install           +
 +                make cd-moh-install              +
 +                                                 +
 +                make uhd-sounds-install          +
 +                make uhd-moh-install             +
 +                                                 +
 +                make hd-sounds-install           +
 +                make hd-moh-install              +
 +                                                 +
 +                make sounds-install              +
 +                make moh-install                 +
 +                                                 +
 +       Install non english sounds:               +
 +       replace XX with language                  +
 +       (ru : Russian)                            +
 +       (fr : French)                             +
 +       ------------------------------------      +
 +                make cd-sounds-XX-install        +
 +                make uhd-sounds-XX-install       +
 +                make hd-sounds-XX-install        +
 +                make sounds-XX-install           +
 +                                                 +
 +       Upgrade to latest:                        +
 +       ----------------------------------        +
 +                make current                     +
 +                                                 +
 +       Rebuild all:                              +
 +       ----------------------------------        +
 +                make sure                        +
 +                                                 +
 +       Install/Re-install default config:        +
 +       ----------------------------------        +
 +                make samples                     +
 +                                                 +
 +                                                 +
 +       Additional resources:                     +
 +       ----------------------------------        +
 +       https://www.freeswitch.org                +
 +       https://freeswitch.org/confluence         +
 +       https://freeswitch.org/jira               +
 +       http://lists.freeswitch.org               +
 +                                                 +
 +       irc.freenode.net / #freeswitch            +
 +                                                 +
 +       Register For ClueCon:                     +
 +       ----------------------------------        +
 +       https://www.cluecon.com                   +
 +                                                 +
 +-------------------------------------------------+
.=======================================================================================================.
|       _                            _    ____ _             ____                                       |
|      / \   _ __  _ __  _   _  __ _| |  / ___| |_   _  ___ / ___|___  _ __                             |
|     / _ \ | '_ \| '_ \| | | |/ _` | | | |   | | | | |/ _ \ |   / _ \| '_ \                            |
|    / ___ \| | | | | | | |_| | (_| | | | |___| | |_| |  __/ |__| (_) | | | |                           |
|   /_/   \_\_| |_|_| |_|\__,_|\__,_|_|  \____|_|\__,_|\___|\____\___/|_| |_|                           |
|                                                                                                       |
|    ____ _____ ____    ____             __                                                             |
|   |  _ \_   _/ ___|  / ___|___  _ __  / _| ___ _ __ ___ _ __   ___ ___                                |
|   | |_) || || |     | |   / _ \| '_ \| |_ / _ \ '__/ _ \ '_ \ / __/ _ \                               |
|   |  _ < | || |___  | |__| (_) | | | |  _|  __/ | |  __/ | | | (_|  __/                               |
|   |_| \_\|_| \____|  \____\___/|_| |_|_|  \___|_|  \___|_| |_|\___\___|                               |
|                                                                                                       |
|     ____ _             ____                                                                           |
|    / ___| |_   _  ___ / ___|___  _ __         ___ ___  _ __ ___                                       |
|   | |   | | | | |/ _ \ |   / _ \| '_ \       / __/ _ \| '_ ` _ \                                      |
|   | |___| | |_| |  __/ |__| (_) | | | |  _  | (_| (_) | | | | | |                                     |
|    \____|_|\__,_|\___|\____\___/|_| |_| (_)  \___\___/|_| |_| |_|                                     |
|                                                                                                       |
.=======================================================================================================.
Checking module integrity in target [/usr/local/freeswitch/mod]


make[2]: Leaving directory '/root/freeswitch/build'
Making install in tests/unit
make[2]: Entering directory '/root/freeswitch/tests/unit'
make[3]: Entering directory '/root/freeswitch/tests/unit'
 /usr/bin/mkdir -p '/usr/local/freeswitch/bin'
  /bin/bash /root/freeswitch/libtool   --mode=install /usr/bin/install -c switch_eavesdrop '/usr/local/freeswitch/bin'
libtool: install: /usr/bin/install -c .libs/switch_eavesdrop /usr/local/freeswitch/bin/switch_eavesdrop
make[3]: Nothing to be done for 'install-data-am'.
make[3]: Leaving directory '/root/freeswitch/tests/unit'
make[2]: Leaving directory '/root/freeswitch/tests/unit'
make[1]: Leaving directory '/root/freeswitch'
步骤四:配置 FreeSwitch
成功安装后,FreeSwitch 将准备就绪。
#将freeswitch作符号软链接
ln -sf /usr/local/freeswitch/bin/freeswitch /usr/bin/
#fs_cli作符号软链接
ln -sf /usr/local/freeswitch/bin/fs_cli /usr/bin/
# 查看常用命令:
freeswitch -help
# 前台启动
freeswitch
# 后台启动
freeswitch -nc
# 停止
freeswitch -stop
#查看freeswitch安装路径
whereis freeswitch
# 查看freeswitch的端口情况:
netstat -anp|grep freeswitch
# 查看FreeSWITCH日志
tail -f /usr/local/freeswitch/log/freeswitch.log
# 客户端链接, 服务端如果启动成功,客户端链接到fs服务器中。
fs_cli
# 如果修改了密码,使用正确的密码登录:
fs_cli -H 127.0.0.1 -P 8021 -p bytedesk123
# 在CLI中常用命令
sofia status                    # 查看SIP状态
show channels                   # 显示当前通话
show calls                      # 显示呼叫统计
reloadxml                       # 重新加载配置
shutdown                        # 关闭FreeSWITCH
/exit                           # 退出CLI
步骤五:对外开放端口号
FreeSwitch 运行需要开放多个端口以支持各种通信协议。请根据您的实际使用情况配置防火墙规则和云服务器安全组,开放相应端口。
5.1 端口分类
🔒 必需开放端口(核心功能)
SIP 信令端口
| 端口号 | 网络协议 | 应用协议 | 配置文件 | 描述 |
|---|---|---|---|---|
| 5060 | UDP & TCP | SIP | sip_profiles/internal.xml | SIP 用户代理服务器,用于 SIP 信令(默认内部配置文件的标准 SIP 端口) |
| 5080 | UDP & TCP | SIP | sip_profiles/external.xml | SIP 用户代理服务器,用于 SIP 信令(默认"外部"配置文件) |
| 5061 | TCP | SIP TLS | vars.xml | 内部 SIP TLS 加密通信端口 |
| 5081 | TCP | SIP TLS | vars.xml | 外部 SIP TLS 加密通信端口 |
WebRTC 端口
| 端口号 | 网络协议 | 应用协议 | 配置文件 | 描述 |
|---|---|---|---|---|
| 5066 | TCP | WebSocket | sip_profiles/internal.xml | 用于 WebRTC 连接 |
| 7443 | TCP | WebSocket Secure | sip_profiles/internal.xml | 用于安全 WebRTC 连接(WSS) |
ESL 管理端口
| 端口号 | 网络协议 | 应用协议 | 配置文件 | 描述 |
|---|---|---|---|---|
| 8021 | TCP | ESL | event_socket.conf.xml | 事件套接字库(mod_event_socket)接口,用于外部控制和监控 |
RTP 媒体流端口
| 端口范围 | 网络协议 | 应用协议 | 配置文件 | 描述 |
|---|---|---|---|---|
| 16384-32768 | UDP | RTP | vars.xml | RTP 媒体流端口范围,用于音频和视频数据传输 |
🔧 可选开放端口
STUN 服务端口
| 端口号 | 网络协议 | 应用协议 | 配置文件 | 描述 |
|---|---|---|---|---|
| 3478 | UDP | STUN | vars.xml | STUN 服务,用于 NAT 穿透 |
| 3479 | UDP | STUN | vars.xml | 辅助 STUN 服务,用于 NAT 穿透 |
其他服务端口
| 端口号 | 网络协议 | 应用协议 | 配置文件 | 描述 |
|---|---|---|---|---|
| 5070 | UDP & TCP | SIP | sip_profiles/nat.xml | SIP 用户代理服务器,用于 SIP 信令(默认"NAT"配置文件) |
| 8081 | TCP | HTTP | FreeSWITCH默认 | 内部 HTTP 服务 |
| 8082 | TCP | HTTP | FreeSWITCH默认 | 内部 HTTP 服务 |
5.2 云服务器安全组配置
如果您使用的是云服务器(如阿里云 ECS、腾讯云 CVM、AWS EC2 等),除了系统防火墙外,还需要在云控制台配置安全组规则:
云服务安全组配置
| 协议类型 | 端口范围 | 授权对象 | 描述 |
|---|---|---|---|
| TCP | 5060 | 0.0.0.0/0 | SIP 内部端口 |
| UDP | 5060 | 0.0.0.0/0 | SIP 内部端口 |
| TCP | 5080 | 0.0.0.0/0 | SIP 外部端口 |
| UDP | 5080 | 0.0.0.0/0 | SIP 外部端口 |
| TCP | 5061 | 0.0.0.0/0 | SIP 内部 TLS |
| TCP | 5081 | 0.0.0.0/0 | SIP 外部 TLS |
| TCP | 5066 | 0.0.0.0/0 | WebRTC WebSocket |
| TCP | 7443 | 0.0.0.0/0 | WebRTC WSS |
| TCP | 8021 | 特定IP/32 | ESL 管理端口(建议限制IP) |
| UDP | 16384-32768 | 0.0.0.0/0 | RTP 媒体流端口 |
| UDP | 3478-3479 | 0.0.0.0/0 | STUN 服务端口(可选) |
重要说明:
- 核心端口必须开放:SIP信令端口(5060/5080)、WebRTC端口(5066/7443)、ESL管理端口(8021)和RTP媒体端口(16384-32768)是FreeSWITCH正常运行的必需端口
- RTP 端口范围:必须开放完整的 UDP 端口范围 16384-32768 用于 RTP 媒体流,这是音频和视频通话的关键端口。如果防火墙未开放这些端口,通话将无法建立或出现单向音频问题
- TLS 加密端口:5061/5081端口用于SIP TLS加密通信,提高安全性
- ESL 安全风险:谨慎考虑是否将 ESL 端口(8021)暴露给外部网络,并务必修改默认密码。ESL 允许执行任意系统命令,建议�只允许特定IP访问
- 端口范围调整:RTP端口范围可根据实际需求调整,但需确保有足够端口用于并发通话
- 生产环境配置:生产环境中应只开放必要的端口,并定期审查安全组规则
- 配置文件关联:端口配置分散在多个配置文件中,修改时需要注意文件对应关系
步骤六:通话测试
1. SIP 客户端配置
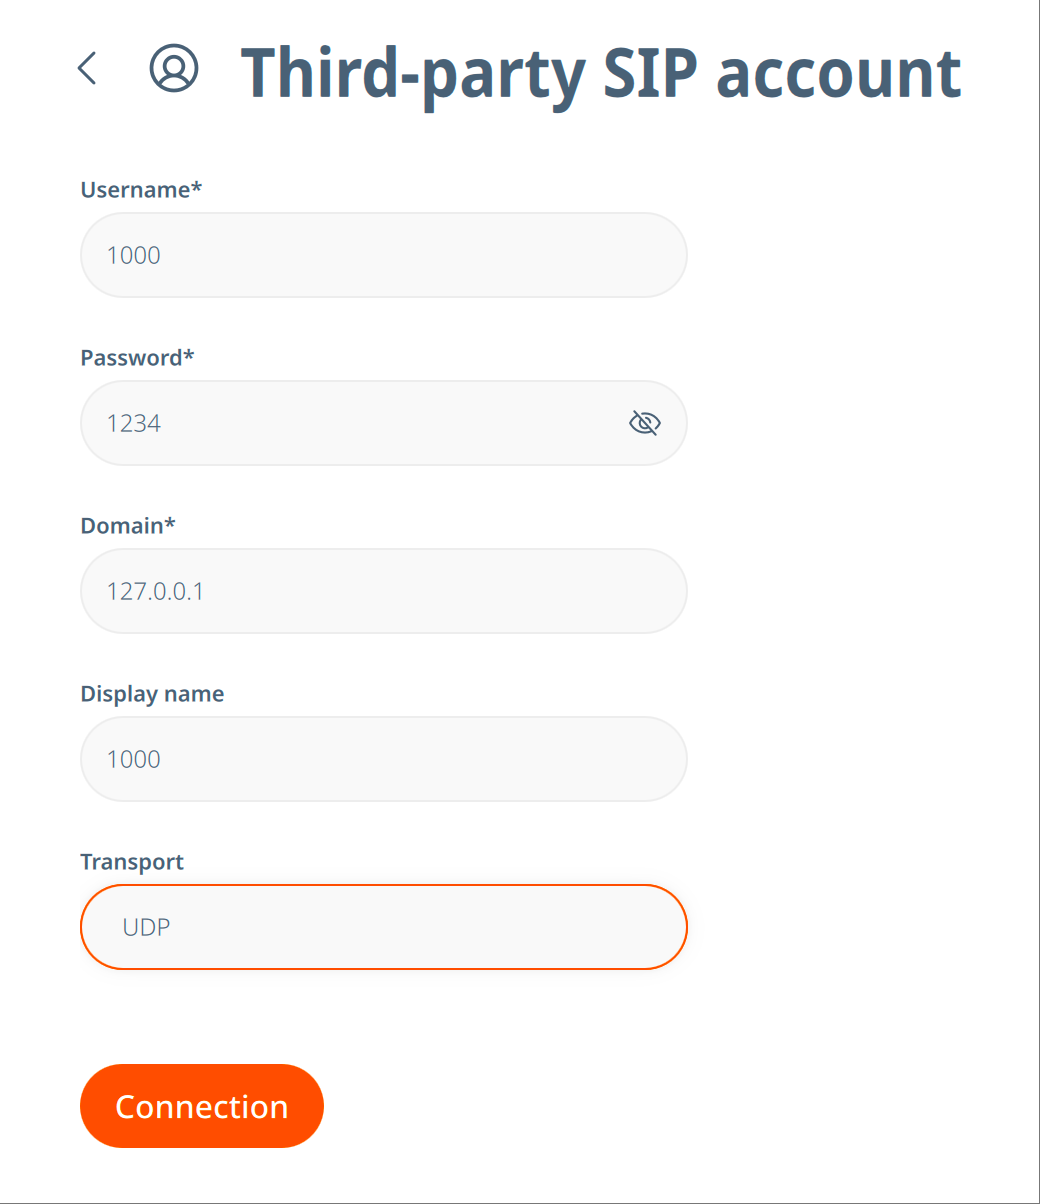
# Freeswitch默认就配置了1000~1019共20个账户
Username: 1000
# Freeswitch 默认密码
Password: 1234
# Sip地址,域名填写自己服务器ip地址,或者域名也行
Domain: 自己服务器ip地址
# UDP
2. 默认测试号码
FreeSWITCH 默认 Dialplan 中配置的测试号码如下:
| 号码 | 说明 |
|---|---|
| 基础测试 | |
| 9664 | 保持音乐 |
| 9195 | echo,回音测试,延迟5秒 |
| 9196 | echo,回音测试,无延迟 |
| 9197 | milliwatte extension,铃音生成 |
| 9198 | TGML铃音生成示例 |
| 铃音测试 | |
| 9180 | 铃音测试,使用远端生成的回铃音 |
| 9181 | 铃音测试,产生英式铃音 |
| 9182 | 铃音测试,使用音乐当铃音,彩铃 |
| 9183 | 先应答,然后发送英式铃音 |
| 9184 | 先应答,然后发送��音乐铃音 |
| 传真功能 | |
| 9178 | 收传真 |
| 9179 | 发传真 |
| 演示功能 | |
| 5000 | IVR演示 |
| 4000 | 语音信箱演示 |
| 9191 | 注册ClueCon |
| 电话会议 | |
| 33xx | 电话会议,48kHz |
| 32xx | 电话会议,32kHz |
| 31xx | 电话会议,16kHz |
| 30xx | 电话会议,8kHz |
| 分机和呼叫组 | |
| 1000~1019 | 默认分机号 |
| 2000~2002 | 呼叫组 |
3. 测试建议
- 基础连通性测试:首先拨打
9196(无延迟回音测试)验证基本通话功能 - 音质测试:使用
9195(延迟回音测试)检查音频质量和延迟 - 铃音测试:拨打
9181或9182测试铃音功能 - 会议功能测试:使用会议号码(如
3000)测试多方通话 - 分机互拨:使用两个不同的分机号(如
1000和1001)测试分机间通话
步骤七:配置微语对接
1. 修改 FreeSwitch 配置
1.1 修改 Event Socket 配置
编辑 Event Socket 配置文件以允许微语系统连接:
# 编辑 event_socket.conf 配置文件
vim /usr/local/freeswitch/conf/autoload_configs/event_socket.conf.xml
将内容替换为:
<configuration name="event_socket.conf" description="Socket Client">
  <settings>
    <param name="nat-map" value="false"/>
    <param name="listen-ip" value="0.0.0.0"/>
    <param name="listen-port" value="8021"/>
    <param name="password" value="bytedesk123"/>

    <!-- 允许微语系统连接的ACL配置 -->
    <param name="apply-inbound-acl" value="bytedesk_allowed"/>
  </settings>
</configuration>
1.2 配置访问控制列表 (ACL)
编辑 ACL 配置文件:
# 编辑 acl.conf 配置文件
vim /usr/local/freeswitch/conf/autoload_configs/acl.conf.xml
在 <network-lists> 节点中添加以下配置:
<configuration name="acl.conf" description="Network Lists">
  <network-lists>
    <!-- 保留原有配置... -->

    <!-- 新增:允许Bytedesk应用程序连接的ACL -->
    <list name="bytedesk_allowed" default="deny">
      <!-- 允许本地连接 -->
      <node type="allow" cidr="127.0.0.0/8"/>
      <node type="allow" cidr="::1/128"/>

      <!-- 允许局域网连接 -->
      <node type="allow" cidr="192.168.0.0/16"/>
      <node type="allow" cidr="10.0.0.0/8"/>
      <node type="allow" cidr="172.16.0.0/12"/>

      <!-- 允许特定的外部IP (请根据实际需要调整) -->
      <!-- 如果Java应用程序在特定的公网IP上运行,请在这里添加 -->
      <!-- <node type="allow" cidr="103.46.244.83/32"/> -->

      <!-- 临时解决方案:允许所有连接 (仅用于测试,生产环境请限制具体IP) -->
      <node type="allow" cidr="0.0.0.0/0"/>
    </list>

    <!-- 保留其他原有配置... -->
  </network-lists>
</configuration>
1.3 重启 FreeSwitch 服务
# 停止 FreeSwitch
freeswitch -stop

# 启动 FreeSwitch
freeswitch -nc

# 或者在 fs_cli 中重新加载配置
fs_cli
reloadxml
/exit
2. 微语系统配置
在微语系统的配置文件中添加以下 FreeSwitch 相关配置:
# ===============================
#= FreeSwitch config
# ===============================
# 启用 freeswitch
bytedesk.call.freeswitch.enabled=true
# freeswitch 服务器 IP (替换为你的实际服务器IP)
bytedesk.call.freeswitch.server=127.0.0.1
# ESL 端口
bytedesk.call.freeswitch.esl-port=8021
# ESL 密码 (与 event_socket.conf 中的密码保持一致)
bytedesk.call.freeswitch.esl-password=password
# SIP 端口
bytedesk.call.freeswitch.sip-port=5060
# WebRTC 端口
bytedesk.call.freeswitch.webrtc-port=7443
# WebSocket 信令端口
#bytedesk.call.freeswitch.ws-port=5066
# 呼叫超时时间 (秒)
#bytedesk.call.freeswitch.call-timeout=120
Docker 环境变量配置
如果使用 Docker 部署微语系统,可以通过环境变量进行配置:
# Docker Compose 环境变量配置
environment:
  # Call FreeSwitch config
  BYTEDESK_CALL_FREESWITCH_ENABLED: "false"
  BYTEDESK_CALL_FREESWITCH_SERVER: 127.0.0.1
  BYTEDESK_CALL_FREESWITCH_ESL_PORT: 8021
  BYTEDESK_CALL_FREESWITCH_ESL_PASSWORD: password
  BYTEDESK_CALL_FREESWITCH_SIP_PORT: 5060
  BYTEDESK_CALL_FREESWITCH_WEBRTC_PORT: 7443
  BYTEDESK_CALL_FREESWITCH_WS_PORT: 5066
  BYTEDESK_CALL_FREESWITCH_CALL_TIMEOUT: 120
注意:
- Docker 环境变量配置与 properties 配置对应关系:
bytedesk.call.freeswitch.enabled→BYTEDESK_CALL_FREESWITCH_ENABLED- 环境变量中的值都需要用引号包围,特别是布尔值和数字
- 确保 FreeSwitch 服务器地址在 Docker 网络中是可访问的
3. 验证连接
3.1 检查 FreeSwitch 状态
# 连接到 FreeSwitch CLI
fs_cli -H 127.0.0.1 -P 8021 -p bytedesk123

# 检查状态
sofia status
show channels
show calls
3.2 测试 ESL 连接
可以使用以下命令测试 ESL 连接是否正常:
# 测试 ESL 端口连接, 注意修改IP地址为你的服务器IP
telnet 127.0.0.1 8021

# 如果连接成功,会看到类似输出:
# Content-Type: auth/request
4. 安全建议
重要安全提示:
- 修改默认密码:确保修改 ESL 默认密码
bytedesk123为强密码 - 限制访问 IP:在生产环境中,建议在 ACL 配置中只允许特定的 IP 地址访问
- 防火墙配置:确保防火墙只开放必要的端口
- 定期监控:定期检查 FreeSwitch 日志文件,监控异常连接
5.4 配置文件位置
| 配置文件 | 路径 | 说明 |
|---|---|---|
| 主配置 | /usr/local/freeswitch/conf/vars.xml | 全局变量和端口配置 |
| 内部SIP配置 | /usr/local/freeswitch/conf/sip_profiles/internal.xml | 内部SIP配置文件 |
| 外部SIP配置 | /usr/local/freeswitch/conf/sip_profiles/external.xml | 外部SIP配置文件 |
| ESL配置 | /usr/local/freeswitch/conf/autoload_configs/event_socket.conf.xml | ESL事件套接字配置 |
5.6 安全建议
重要安全提示:
- 限制 ESL 端口访问:ESL 端口 8021 具有高权限,建议只允许特定 IP 访问
- 使用 TLS 加密:生产环境建议启用 SIP TLS(5061/5081 端口)
- 定期审查规则:定期检查安全组和防火墙规则,移除不必要的开放端口
- 使用非标准端口:考虑修改默认端口以减少恶意扫描
- 监控连接日志:定期检查访问日志,发现异常连接及时处理
- 最小权限原则:只开放必要的端口和 IP 范围
- 网络分段:将 FreeSWITCH 放在 DMZ 区域,内外网分离
完成以上配置后,微语系统就可以与 FreeSwitch 正常通信,实现呼叫中心功能。
Mac 安装 Freeswitch
brew install freeswitch
# FreeSWITCH 通常会安装在 /usr/local/freeswitch
# 启动
freeswitch