Personalized Service
This page explains how to implement personalized service experiences for different user levels by using the vipLevel parameter to display different customer service content for different user levels.
- Demo link: Personalized Service Demo
- Demo code:
- Personalized Service Example-React
- Personalized Service Example-Vue
Note: Please ensure you have completed the basic configuration of User Information Integration to better implement personalized service functionality.
Why do we need personalized service?
In actual business scenarios, you may want to:
- Provide differentiated service content for users of different levels
- VIP users receive more detailed or higher-level answers
- Display different product introductions based on user levels
- Provide different promotional information for users of different levels
- Achieve more refined user operations
Through personalized service functionality, you can provide more accurate and personalized service experiences for users of different levels.
Integration Method
The Weiyu customer service system supports passing user level information through configuration parameters. When initializing the customer service component, pass the vipLevel parameter through the chatConfig configuration item.
Core Parameters
The following are the core parameter configurations for personalized service functionality:
chatConfig: {
  // Required parameters
  org: 'df_org_uid',        // Your organization ID
  t: "1",                   // Session type
  sid: 'df_wg_uid',         // Session ID

  // User information parameters
  visitorUid: 'visitor_001',       // User unique ID
  nickname: 'Visitor Xiao Ming',   // User nickname
  avatar: 'https://example.com/avatar.jpg', // User avatar URL

  // VIP level parameter - This is the key to personalized service
  vipLevel: 4,              // User VIP level, can be an integer from 1-10

  // Custom fields, can pass any additional information
  extra: JSON.stringify({
    userType: 'vip',
    registerTime: '2025-01-01',
    // Any other information you want to pass
  })
}
Complete Example Code
Below is a complete personalized service example demonstrating how to display different content based on different user levels:
import { useState } from 'react';
import { Button, Card, Typography, Space, Select } from 'antd';
import { BytedeskReact } from 'bytedesk-web/react';

const { Title, Paragraph } = Typography;
const { Option } = Select;

const VipLevelDemo = () => {
    // Current selected VIP level
    const [vipLevel, setVipLevel] = useState(1);

    // Configure customer service component
    const config = {
        placement: 'bottom-right',
        autoPopup: false,
        marginBottom: 20,
        marginSide: 20,
        buttonConfig: {
            show: false,  // Hide default button
        },
        chatConfig: {
            org: 'df_org_uid',    // Replace with your organization ID
            t: "1",
            sid: 'df_wg_uid',     // Replace with your SID
            // User information parameters
            visitorUid: 'visitor_001',
            nickname: 'Test User',
            avatar: 'https://example.com/avatar.jpg',

            // Set VIP level
            vipLevel: vipLevel,

            extra: JSON.stringify({
                userType: 'vip',
                registerDate: '2025-05-01'
            })
        },
        locale: 'zh-cn',
    };

    // Switch VIP level
    const handleVipLevelChange = (level) => {
        setVipLevel(level);
    };

    // Open chat window
    const handleShowChat = () => {
        console.log("Open chat window");
        (window).bytedesk?.showChat();
    };

    return (
        <div style={{ padding: '24px' }}>
            <Title level={2}>Personalized Service Demo</Title>
            <Paragraph>
                This example demonstrates how to pass user VIP level (vipLevel) to the customer service component through configuration parameters.
                Select different VIP levels to see different customer service content.
            </Paragraph>

            <Card style={{ marginTop: '20px' }}>
                <Space direction="vertical" size="large" style={{ width: '100%' }}>
                    <div>
                        <Title level={4}>Current VIP Level:</Title>
                        <Select
                            value={vipLevel}
                            onChange={handleVipLevelChange}
                            style={{ width: 200 }}
                        >
                            <Option value={1}>Regular User</Option>
                            <Option value={2}>Bronze Member</Option>
                            <Option value={3}>Silver Member</Option>
                            <Option value={4}>Gold Member</Option>
                            <Option value={5}>Diamond Member</Option>
                        </Select>
                    </div>

                    <div style={{ textAlign: 'center', marginTop: '16px' }}>
                        <Button type="primary" size="large" onClick={handleShowChat}>
                            Contact Customer Service
                        </Button>
                    </div>
                </Space>
            </Card>

            {/* Import Weiyu customer service component */}
            <BytedeskReact {...config} />
        </div>
    );
};

export default VipLevelDemo;
H5 Link Integration Method
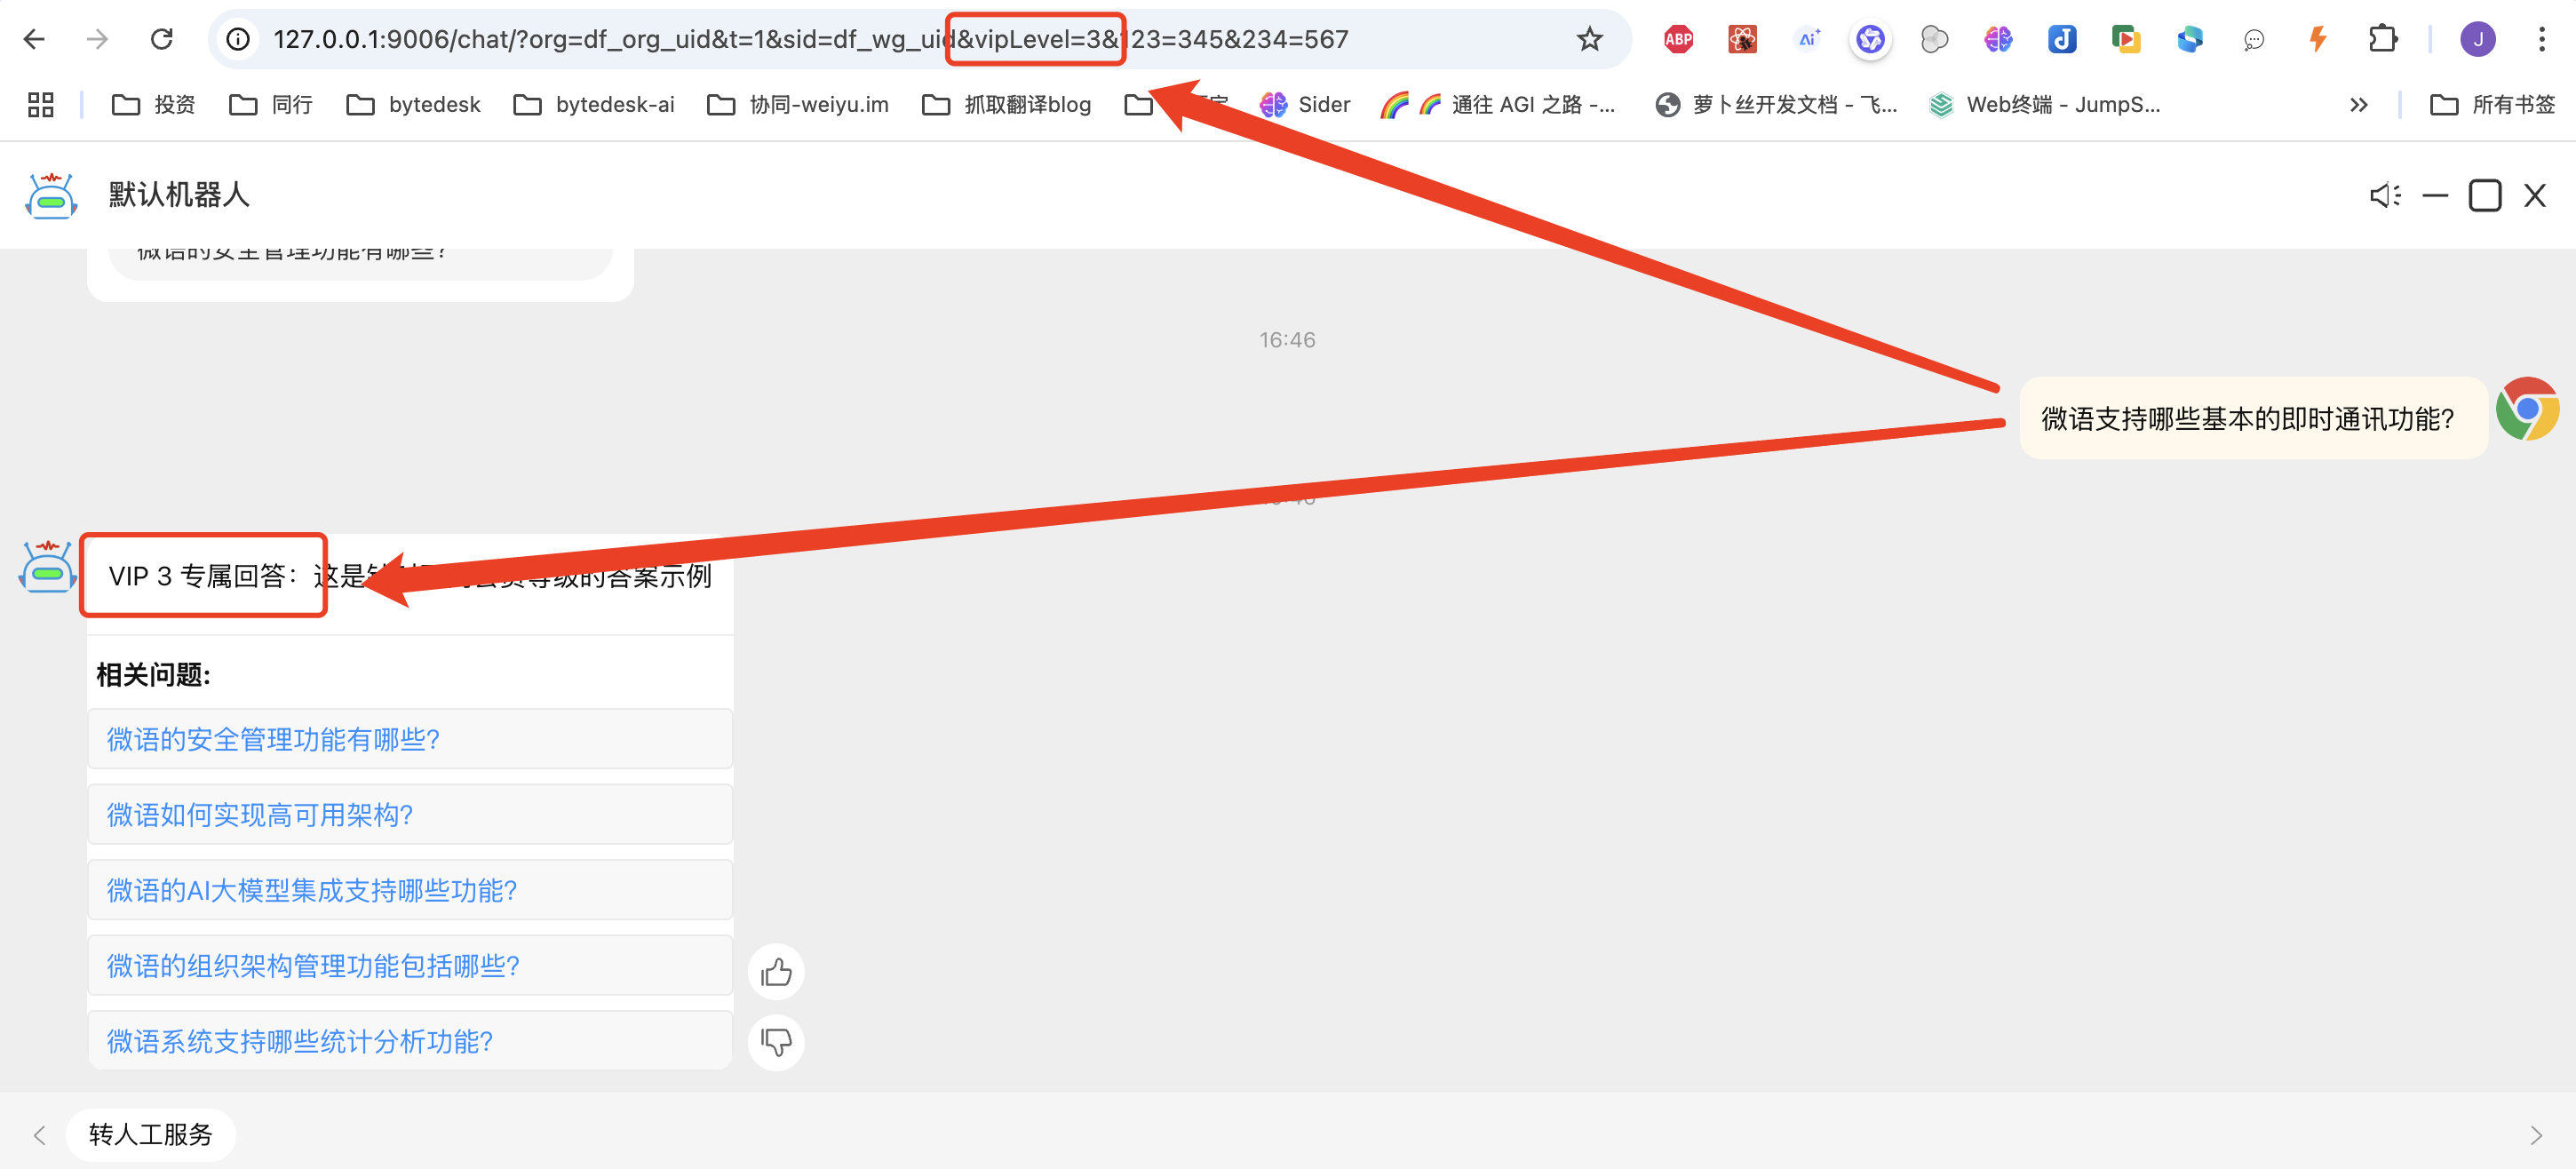
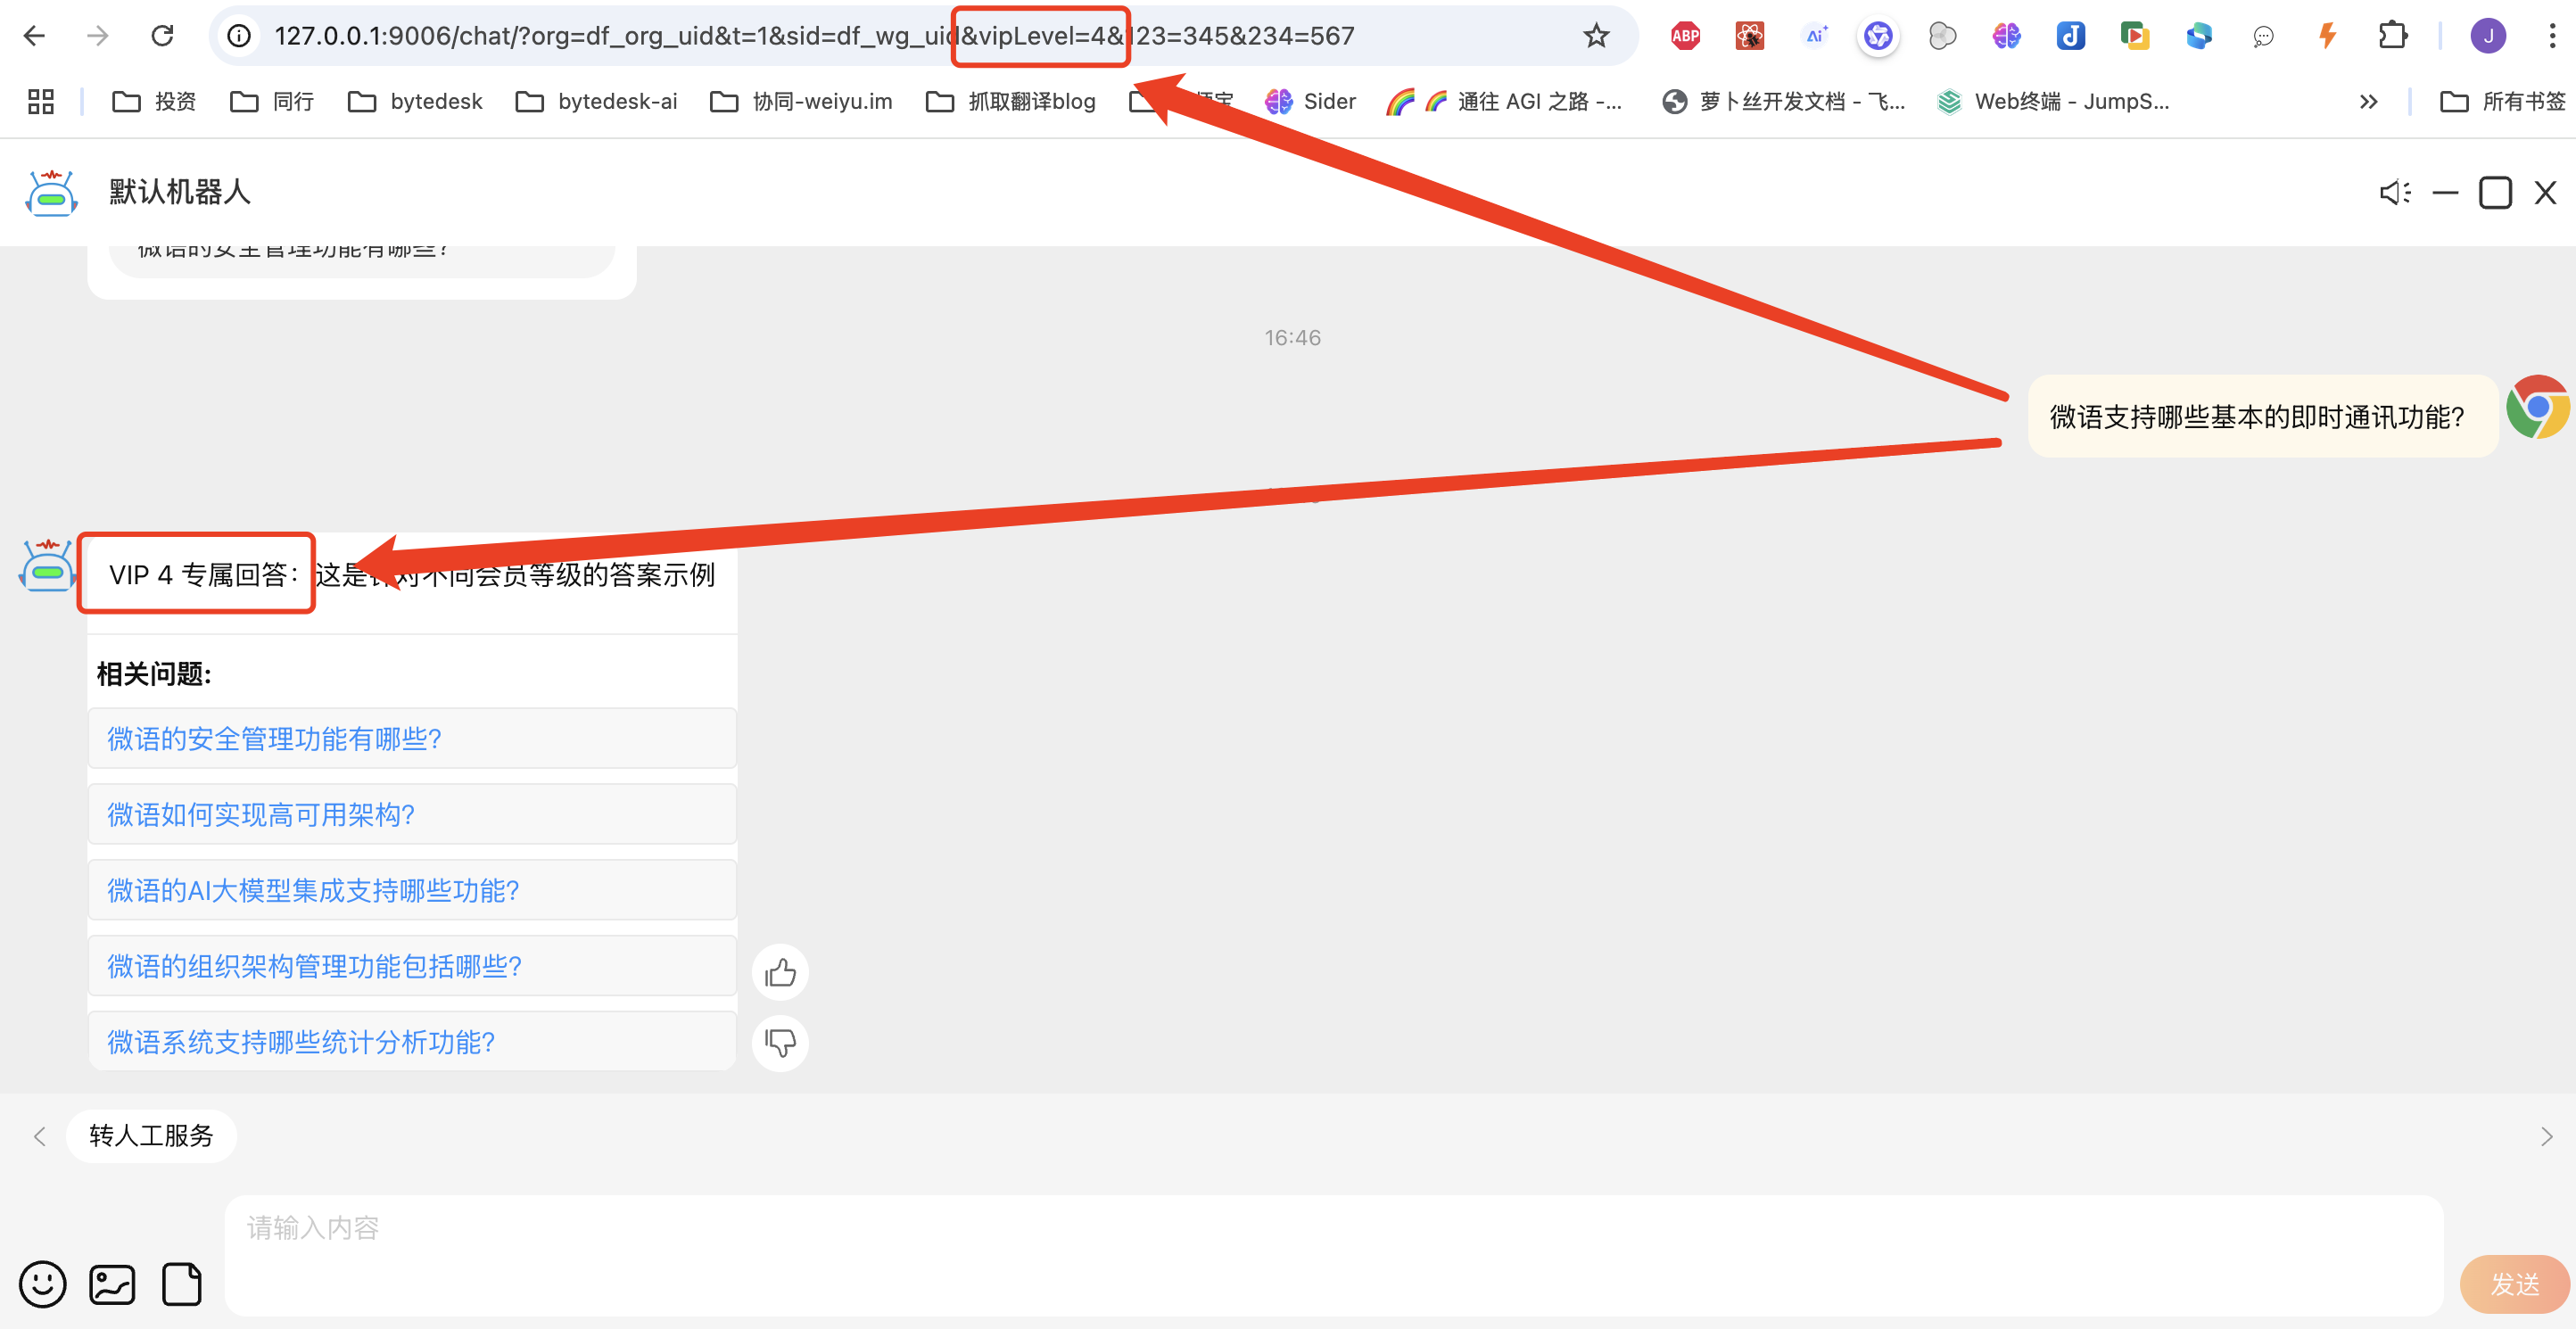
In addition to component integration, the Weiyu customer service system also supports directly passing VIP level information through URL parameters, suitable for H5 pages or quick integration scenarios.
H5 Link Format
The basic link format is as follows:
https://www.weiyuai.cn/chat/?org=Your Organization ID&t=1&sid=Session ID&visitorUid=User ID&nickname=User Nickname&avatar=Avatar URL&vipLevel=User Level&extra=Additional Information JSON
Parameter descriptions:
org: Your organization IDt: Session type, usually 1sid: Session IDvisitorUid: User unique identifiernickname: User nickname (URL encoding required)avatar: User avatar URL (URL encoding required)vipLevel: User VIP level (integer from 1-10)extra: Additional information (JSON string, URL encoding required)
Example Code
// 1. Prepare basic user information
const userId = 'user12345';
const userNickname = 'Zhang San';
const userAvatar = 'https://example.com/avatar.jpg';
const userVipLevel = 4;  // VIP level

// 2. Prepare additional information (optional)
const extraInfo = {
  userType: 'vip',
  registerTime: '2025-01-01',
  memberLevel: 'Gold Member'
};

// 3. URL encoding processing
const encodedNickname = encodeURIComponent(userNickname);
const encodedAvatar = encodeURIComponent(userAvatar);
const encodedExtra = encodeURIComponent(JSON.stringify(extraInfo));

// 4. Concatenate complete URL
const chatUrl = `https://www.weiyuai.cn/chat/?org=df_org_uid&t=1&sid=df_wg_uid&visitorUid=${userId}&nickname=${encodedNickname}&avatar=${encodedAvatar}&vipLevel=${userVipLevel}&extra=${encodedExtra}`;

// 5. Use this link for navigation or generate a button
window.location.href = chatUrl;
// Or create a link
// <a href="${chatUrl}">Contact Customer Service</a>
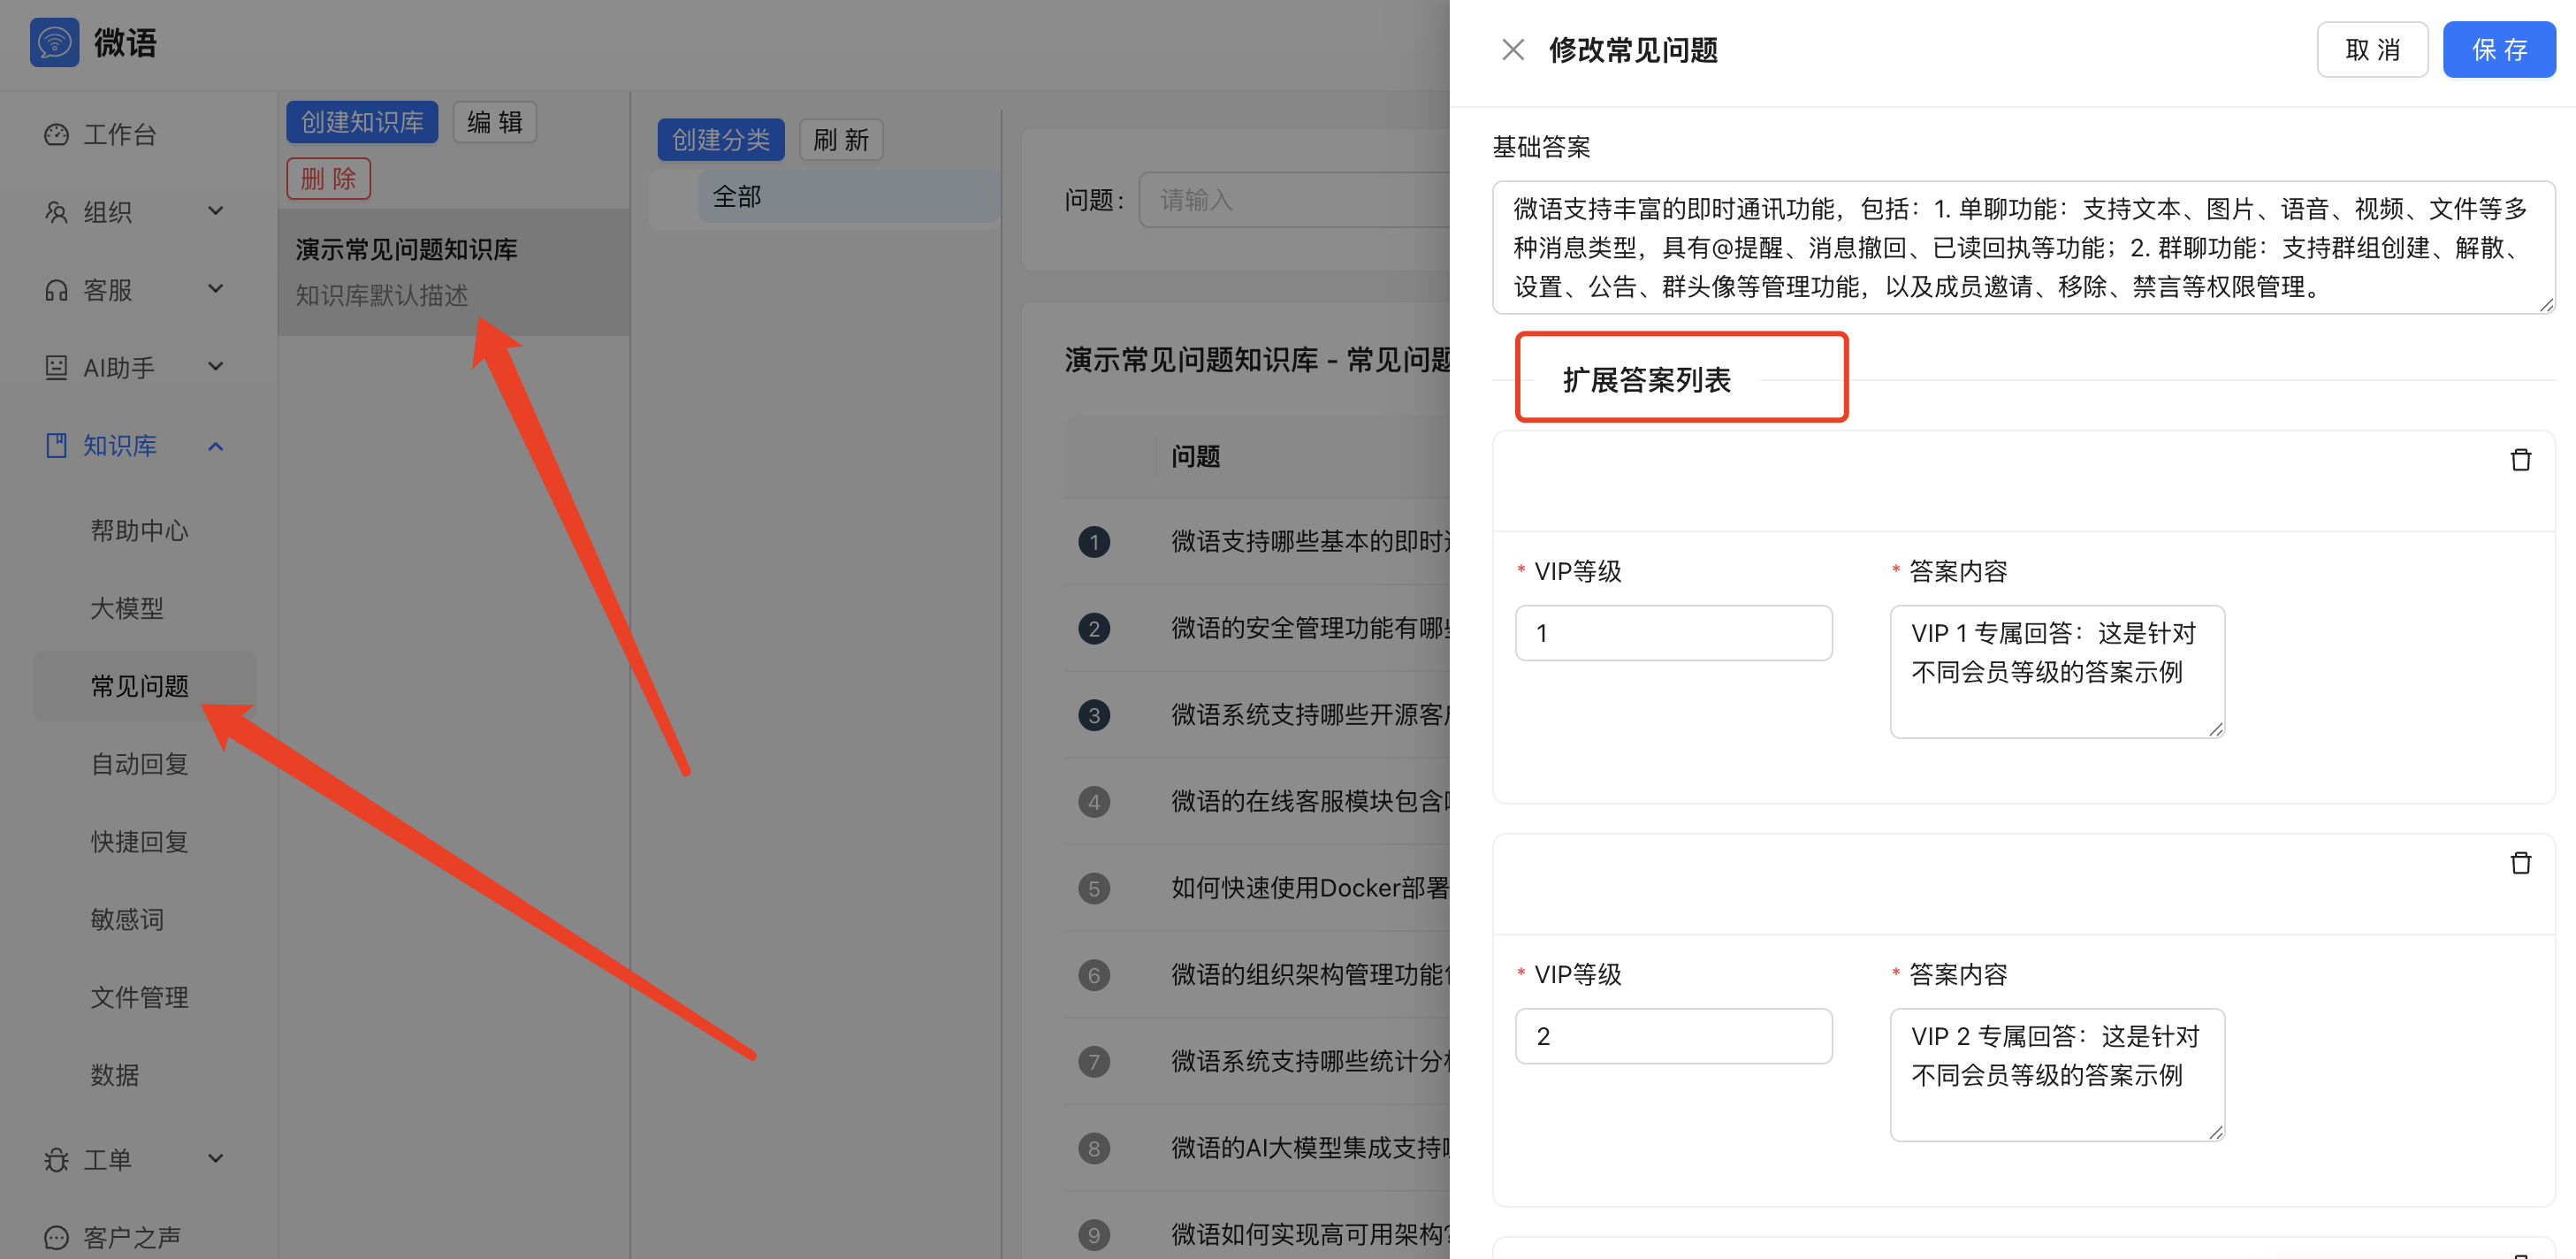
Admin Backend Configuration
1. Add Extended Questions
In the admin backend, you can configure different answer content for different VIP levels:
- Enter the FAQ management in the admin backend
- Click "Add Extended Question"
- Set the corresponding VIP level in the question configuration
- Configure different answer content for different levels
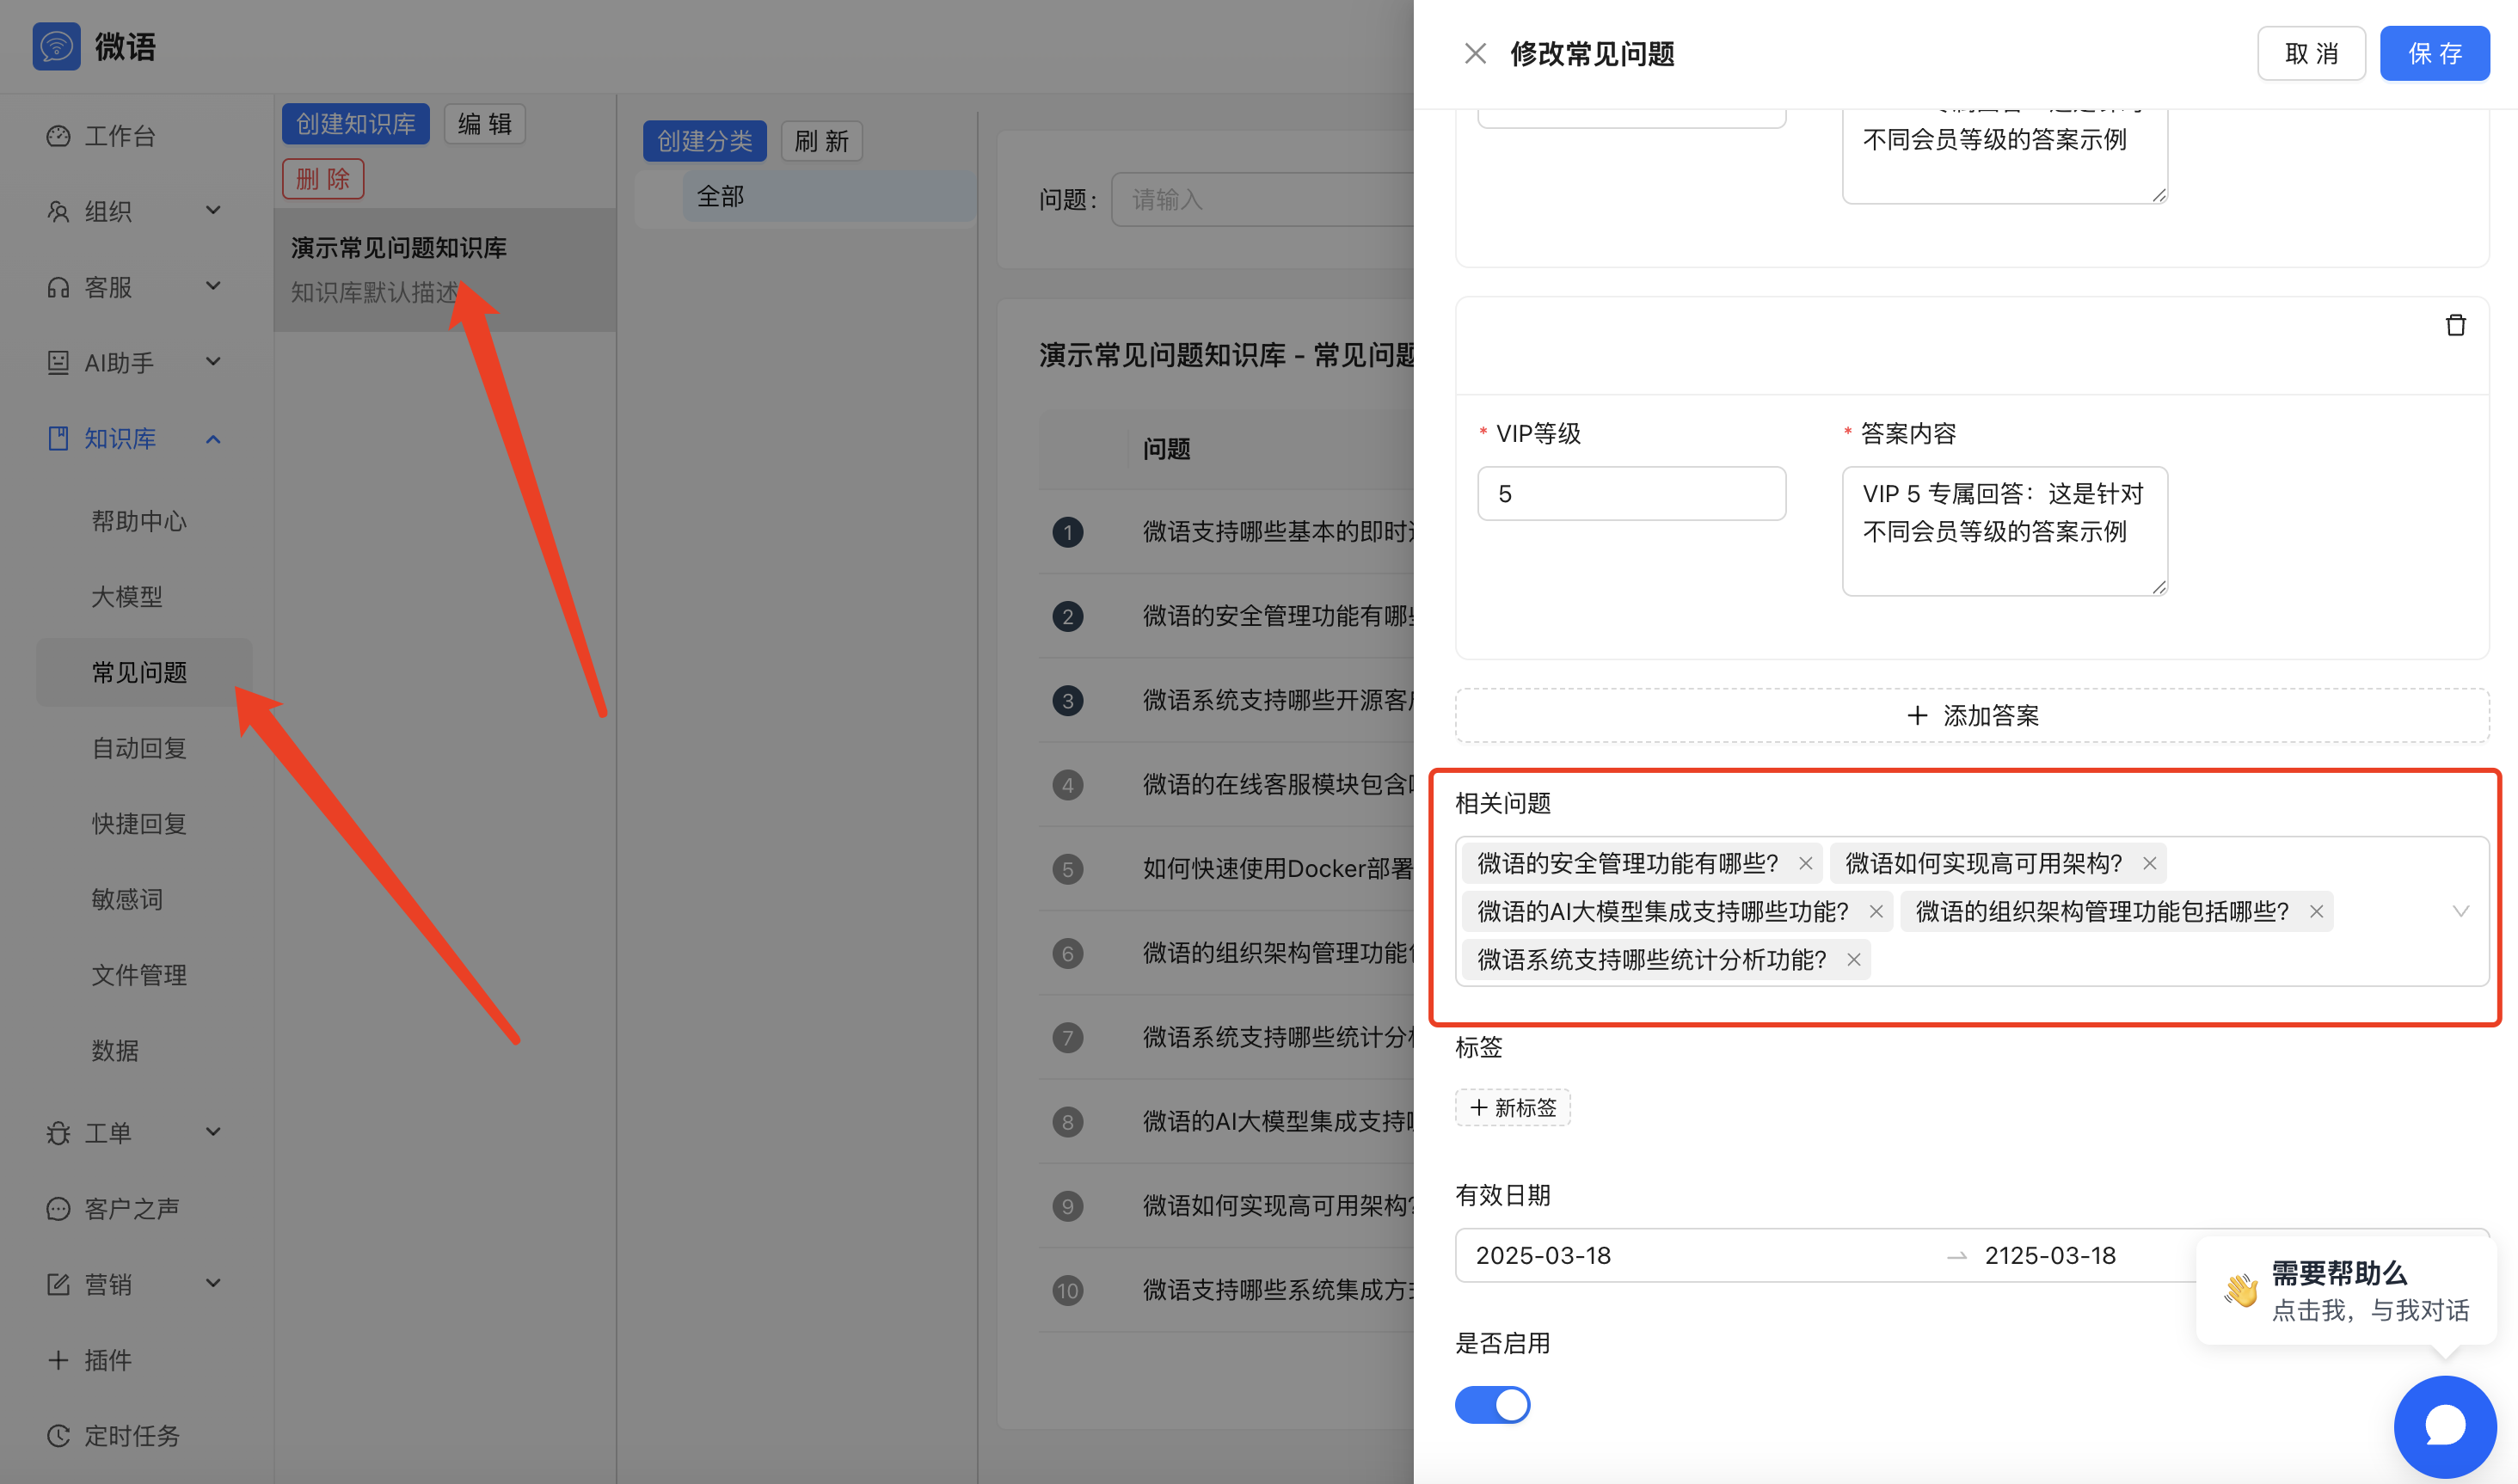
2. Add Related Questions
You can also configure related questions for different VIP levels:
- On the question detail page
- Click "Add Related Question"
- Set related questions corresponding to different VIP levels
Best Practices
- Level Division: It is recommended to divide VIP levels into 1-10 levels for easy management and expansion
- Content Differentiation: Ensure there are obvious value differences in content between different levels
- Dynamic Adjustment: Adjust content at each level in time based on user feedback
- Smooth Transition: Set reasonable content transitions between levels
- Data Statistics: Regularly analyze usage patterns of users at different levels
Important Notes
- Level Range: The
vipLevelparameter is recommended to use integers from 1-10 - Content Maintenance: Regularly check and update content at each level
- Compatibility Handling: For users without set levels, the system will use basic content by default
- Update Mechanism: When user levels change, the customer service component needs to be re-initialized to apply new level information
Effect Display
Users of different VIP levels will see different answer content: